Projecten
nul insteller

![]()

Milling holes and circles
| ||||
|
Van deze pagina is geen Nederlandse versie beschikbaar, hieronder staat de Engelstalige pagina. |
||||
|
Milling holes and circles in G-code
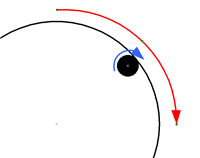
Now let's get going with some G-code. Milling a circle or an arc needs three sets of coordinates:
The mill now moves from point 1 to 3 around the centre point 3. If the start and end-point are the same a complete circle is made. To mill a hole (or actually only the contour of the hole, we need to take a number of steps:
So to mill a circle with a radius of 4 and the centre at x,y = 10,10 at a depth of -1 we have to move to a starting point at the arc first, I take the given point in the picture above as starting point, this is as the same Y coordinate as the centre and the X coordinate is at x - radius (in this case 10-4 = 6). A move is always done in a straight line so only after arriving at the starting point we move down to -1. This is done using the following G-code: G0 x 6 y 10 G1 z -1 A G0 (this is a zero, not the letter O) will move at high speed to the starting point and G1 will move the mill down at the feedrate (set with the F... command), for now I assume that the F speed is already set. Now we are ready to move in a circle. We have to specify the XY plane (using G17) before starting to mill a clockwise circle (using G2). The centre location is specified relative from the starting point so for the center X equals to 4 (the radius) and Y 0. To mill a whole circle, we have to end at the same coordinates as we started from (so 6, 10): G17 G2 x 6 y 10 i 4 j 0 z -1 As you can see there are two sets of coordinates specified in the line above: x, y specifies the end point and i, j the centre. I always specify the z coordinate also telling to stay at the same depth. Moving to a different Z-value would mill a helix (i.e. the mill would move up or down along the arc). And clear away from the workpiece: G0 z 1 So that's it, we are done - right? No, all we did is move a full circle and if I had a 3mm flat tip cutter this will result in a hole that is too large. The centre of the cutter moves along the circle so we have removed too much material (on all sides the radius of the cutter) so we have to compensate for the cutter radius:
This results in the following piece of code: G0 x 7.5 y 10 G1 z -1 G17 G2 x 7.5 y 10 i 2.5 j 0 z -1 G0 z 1 And now we are done! We have a contour that might leave a hole of the given size at the wanted location. If we need a hole with a large radius we need to repeat the movement starting with smaller circles and moving to larger ones until the wanted diameter is reached. Same goes for the depth, we can not remove too much material at once depending on the material, cutter type, spindle speed and feedrate. |
||||
|
Using variables The example above is nice, but I do not want to calculate all this every time by hand. Variables in G-code are denoted by a # followed by a number. I could give a whole explanation of how to do this, but let's just show the code: #1 = 10 ( X of centre of circle ) #2 = 10 ( Y of centre ) #3 = 8 ( Diameter of circle ) #4 = 3 ( Cutter diameter ) #5 = -1 ( Z depth ) #6 = [#3 - #4] ( Diameter of circle to mill #6 = [#6 / 2] ( Radius of circle to mill ) G0 z 2 G0 x [#1 - #6] y #2> G1 z #5> G17 G2 x [#1 - #6] y #2 i #6 j 0 z #5 G1 z 2 First there are the five parameters to mill a hole at coordinates 10,10 at a depth of -1 with a radius of 4 (diameter = 8) and a 3mm cutter. As you will notice I added an extra G0 z 2 at the beginning of the milling path, this is just to make sure that the movement towards the starting point is always done above the work piece. Otherwise there is a chance that we come across some pieces that are in between our current position and the starting point. |
||||
|
Subroutines, using the same lines of G-code more than once Ok, that worked. But now we want to create multiple circles without having to copy and paste all those lines of code through the whole file. Parameters given to this subroutine when being called are also numbered, starting at #1 and ranging up to the number of parameters we specify in the call:
And now we can call this subroutine as often as we like. So now we are done, milling our hole with a diameter of 8 mm can finally be completed. O100 call [10] [10] [5] [3] [-1] O100 call [10] [10] [8] [3] [-1] The first circle should always be smaller than twice the mill diameter, otherwise some material is left in the middle of the hole and on my machine I don't like to remove too much material at once so when milling edges (and the second circle is just a round edge) I never remove more than half the mill diameter in one go, so the circles are at max. the mill diameter apart.
|
||||
|
The other way around: creating a round outer surface Is easy to do. Just add the diameter of the mill to the diameter of the circle to mill and use a counterclockwise move using the G3 command instead of the G2. |
||||
|
To Do ... I could post a complete .ngc file that mills a real object, e.g. the circuit board for my tool height indicator. That gives a nice example with just a bit more than only circles. |